'Tis the season for rhubarb! I know, I know - rhubarb season started a long time ago; but it's still going on and I'm in the midst of harvesting my second cutting, so I thought I'd share some of the great recipes I've discovered. This first one (yes, look for future rhubarb postings!) is a new one to me this year. My dear friend Carolyn shared this recipe; it's a cake her mother made when she was growing up, and I'm excited to be able to pass it on to you!
I have to admit that I was skeptical of rhubarb cake when I first heard of it. Up until now, I'd only had rhubarb crisps and pies. But one taste was all it took - I was a convert! The crispy brown sugar topping adds just the perfect touch of texture and sweetness. Now I almost prefer it to pie.
I made this particular batch at my parent's house this weekend (can you believe they hadn't even harvested their first batch of rhubarb?!? Something had to be done!). I took advantage of the beautiful day to snap an outdoor picture!
Rhubarb Cake
1 c. buttermilk (set aside - buttermilk substitute recipe below)
2 c. diced rhubarb
1/2 c. sugar
(mix and let stand)
1/2 c. softened butter
1 1/2 c. sugar
(cream together)
Add one egg to the creamed butter and sugar.
2 c. flour
1 tsp. baking soda
1 tsp. cinnamon
dash of salt
In a medium bowl, sift dry ingredients together - I whisk!
Add dry ingredients to butter, sugar and egg mixture.
1 c. buttermilk
1 tsp. vanilla
(add to rhubarb)
Add rhubarb and buttermilk mixture to the flour and butter mixture and blend all completely (I use my Kitchen-Aid and it works perfect!)
Pour into a 9x13 pan and bake for 30 minutes at 350 degrees.
Sprinkle on topping evenly and bake another 30 minutes.
Rhubarb Cake Topping
1/2 c. brown sugar
1 tsp. cinnamon
2 tsp. softened butter
2 T. flour
Mix with pastry blender or fork.
Buttermilk Substitute
Place 1 T. lemon juice or white vinegar in a liquid cup measurer (I actually used cider vinegar as we didn't have lemon juice or white vinegar and it worked just fine). Fill with milk up to 1 cup line. Let stand for 5 minutes, then use as recipe requests
Rhubarb cake is also a great way to use frozen rhubarb (if you're like me, you can never eat it all in time). Last time I tried using frozen rhubarb to make a cake, it was very flat and mooshy; apparently rhubarb looses any sense of shape when frozen. Fortunately, rhubarb cake doesn't need rhubarb to hold it's shape, so now I have a great recipe to bring back summer in the dead of winter - as well as enjoy when fresh! (Disclaimer: Although I haven't tried it with frozen rhubarb yet, I'd probably recommend draining the thawed rhubarb or the cake will probably not set properly.)
Enjoy!
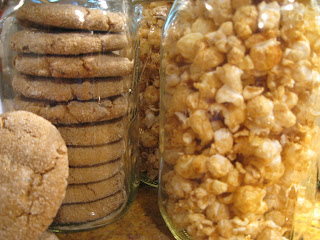
Caramel Corn & Ultimate Ginger Cookies
When it comes to food and my dad, there's a few things that quickly come to mind: one is making caramel corn with us when we were kids, and the other is his love for ginger. I remember making caramel corn well, not just because of the delicious reward, but mostly because it took a certain amount of pain; separating the hot, sticky pieces always burned my fingers. I'm glad to report that as an adult, it's much more tolerable and not nearly as painful as I remember! It's also surprisingly simple.
Caramel Corn
2 c. brown sugar
1/2 c. butter
1/2 c. corn syrup
1 tsp. salt
1 tsp. baking soda
7 1/2 quarts popped popcorn
1. Pop popcorn and divide between two paper bags - I use grocery bags.
2. Boil the first 4 ingredients for 5 minutes, reduce heat but keep boiling.
3 Add: 1 tsp. baking soda (keep your eye on the caramel as it will really puff up with the addition of the baking soda!) Stir baking soda into caramel.
4. Pour 1/2 of caramel over popcorn in each bag. Quickly stir as much as possible with a wooden spoon - be sure to stir the bottom and corners.
5. When caramel stops coating popcorn easily, roll top of bag over and place in microwave for one minute. Stir again. Repeat one or two more times until popcorn is evenly coated. Be careful not to microwave too many times or the caramel will burn.
6. When caramel is evenly distributed on the popcorn, pour into a wide, shallow bowl and break clumps up with your hands to create separate pieces of caramel corn. Be sure to store leftover caramel corn (if there is any) in an airtight container to prevent it from going stale.
Enjoy!
As I mentioned before, my dad has a love for all things ginger. His Christmas stocking always has ginger candies and other ginger delectables. I've had a recipe I found in a Barefoot Contessa cookbook that I've been dying to make for him. He came over on Sunday so I took the opportunity to try out the recipe. The results? He said it is quite possibly the best cookie he has ever had. My mother-in-law happened to stop by during the baking and tried a cookie. She called back the next day and asked if she could have a few; when she heard there weren't many left, she figured she'd be happy if she could have just one more. I guess they really might be the Ultimate Ginger Cookie.
Ultimate Ginger Cookies
Here's the recipe: Ultimate Ginger Cookies
I find the best place to find candied ginger is the bulk section of your grocery store - it's much more affordable than in the spice aisle! I also made the cookies slightly smaller (using a small icecream scoop) and got about 25 normal size cookies out of the recipe.
Tacos
I know. You're thinking that everyone already knows how to make tacos. Well, the fact that they're so easy is half the reason they're so great! These are a lower-cal version of your typical taco - but full of flavor, so don't stop reading just yet. They're also a little unusual because they are made with elk meat. Elk meat is a great substitute for beef, and much leaner. Of course, you can always use a lean (I like less than 10% fat) ground beef if you can't find elk meat. I was a little disappointed at first that I didn't have cheese or sour cream, but the lime really gave them a fresh, zesty flavor and I didn't miss the cheese or sour cream. They'd be even better if you topped them with fresh avocado.
Tacos
1lb ground elk meat
1 taco seasoning packet
1 tomato, diced
1/2 yellow or orange bell pepper, diced
4 Tbs. chopped cilantro
1/2 lime, sliced
1. Brown the elk meat and season according to package instructions.
2. Chop vegetables and assemble your taco as desired.
3. Squeeze lime juice generously on each taco.
4. Enjoy!
Makes about 6 tacos.
Couscous Salad
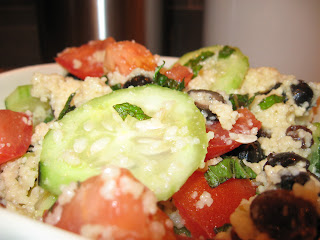
I love shopping at the Metropolitan Market. Especially when it's prime shopping time; that's when they have someone cooking up samples! And handily, they have recipe cards of whatever it is they're cooking up should you want to try it at home, which is almost always. One of the recipes I picked up was for a couscous salad. With summer coming, I thought it would be perfect timing to share this simple salad that can work as a side dish at a picnic or as a main dish on a hot summer day!
We had it tonight, and, to give credit where credit is due, my husband cooked. Here's a few things we changed in the recipe: the cucumber wasn't seeded (evidenced in the picture!), we used a can of sliced olives and only 1/4 cup of olive oil (it originally called for 1/2 a cup). It turned out great!
Couscous Salad
1 cup couscous, cooked
juice of 4 baby lemons
1/4 cup olive oil
1/2 cup mint, minced
1 cucumber, peeled and seeded
2 tomatoes, chopped
16 black olives
1/4 cup raisins
1 avocado for garnish
1. Prepare couscous according to package directions and chill.
2. In a large bowl, combine olive oil, lemon juice, and mint. Season with salt and pepper to taste. Toss in prepared couscous.
3. Dice one of the tomatoes and cucumber; add to the couscous along with the raisings and olives. Toss gently.
4. Line serving bowl with the couscous salad. Slice the remaining tomato and the avocado in wedges to garnish.
Serves 4 (3 if it's the main dish for dinner!)
Subscribe to:
Posts (Atom)